
August 19, 2022
Angular / NestJS Starter Project
Getting startet
|
1 |
npm i -g @nestjs/cli |
|
1 2 3 |
nest new angular-de-nestjs-tutorial cd angular-de-nestjs-tutorial npm run start |
Training Server Project
To show you how to use Nest as the backend of your Angular Application ( or any Other Client Application using a HTTP Client), we have a look into a basic server we use in our trainings. The server supplies the client application with the trainings, that are scheduled in the future. Each training contains a logo-URL of the technology teached in the course. This logo-image is served by the Nest-Serve as well.
To meet these requirements, the server has to have two controllers, that handle the request for the trainings and the requests for the logos.

Project Scaffolding
Let’s have a look at the overall project structure of a NestJS application. The main selling point of the framework is its architectural design, which is very close to Angular’s structure. Word on the street is, that the developer of NestJS really liked the architectural concept of Angular and applied it to their Backend Framework. This explains the obvious similarities in structure, handling and naming.
This doesn’t mean that NestJS is made exclusively for Angular Frontends thought. Its a standalone Framework supplying the developer with a clear architecture model and can be combined with every frontend framework of your choice. The communication happens over a REST interface.
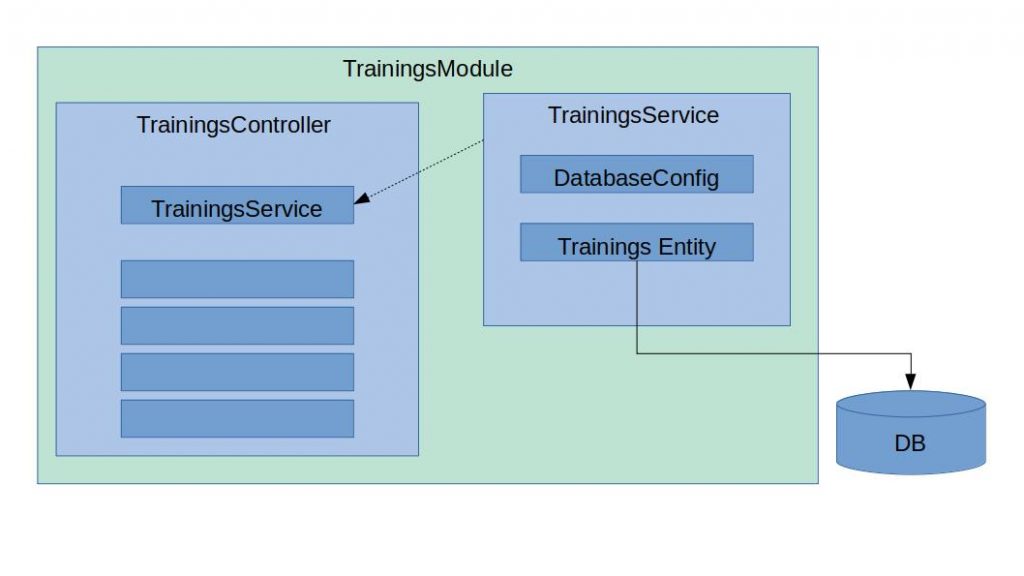
In the illustration above we can see the fundamental architectural elements, that make up our example application for the Training App.
One of the main concerns of NestJS are modularization. therefore on the highest level functionality is bundled into modules. Therefore the code, that handles the training data, is encapsulated in the TrainingModule of our example.
|
1 |
of our example. |
Bundled in the module we find the next layer of encapsulation in the shape of controllers and services. These building blocks handle the requests of the frontend (controllers) and retrieving data from the database (services). Let’s have a closer look how they are structured and how they look in our example use case.
Controllers
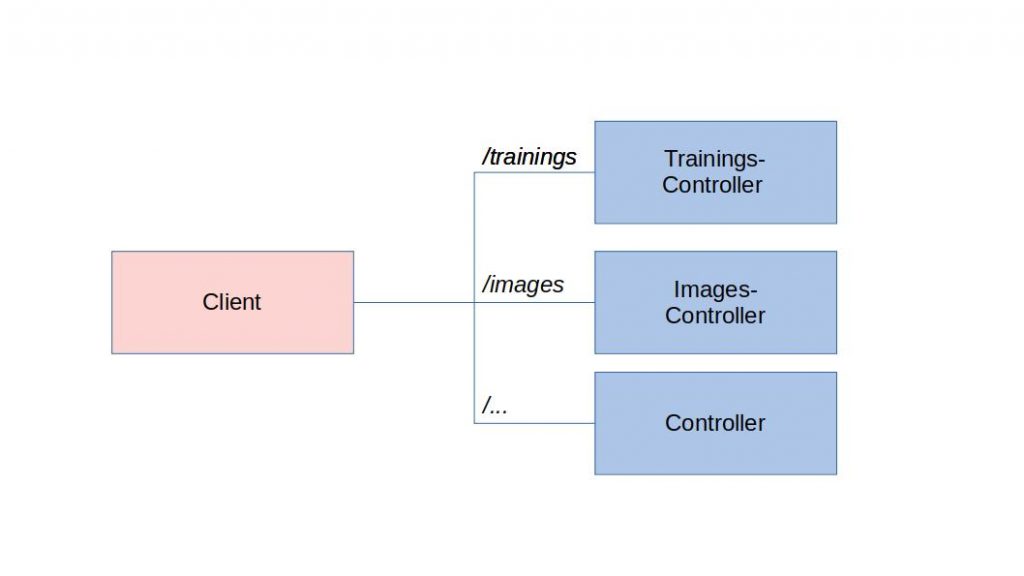
As you can see in the illustrated model above, there is a controller for each route, that can be accessed. In our example case two controllers are of interest: the trainings controller with the route /trainings and the images controller with the route /images. in the following code-snippet we have a look into the trainings-controller class.
|
1 2 3 4 5 6 7 8 9 10 11 12 13 14 15 16 17 18 19 20 21 22 23 24 25 26 27 28 29 30 31 32 33 |
@Controller('trainings') @ApiTags('trainings') export class TrainingsController { constructor(private readonly trainingsService: TrainingsService) { } @Get() @ApiResponse({ status: 200, description: 'All Trainings.'}) findAll(@Response() res): string { const trainings = this.trainingsService.findAll(); return res.status(HttpStatus.OK).json(classToPlain(trainings)); } @Get(':id') @ApiResponse({ status: 200, description: 'Training with given id.'}) @ApiResponse({ status: 404, description: 'Training with given id does not exist.'}) findOne(@Param() params, @Response() res): string { const id = parseInt(params.id, 10); if (isNaN(id)) { return res.status(HttpStatus.BAD_REQUEST).json(); } const training = this.trainingsService.findOne(id); if (training) { return res.status(HttpStatus.OK).json(classToPlain(training)); } else { const error = new CustomError(HttpStatus.NOT_FOUND, 'Not found', `Id ${id} not found.`); return res.status(HttpStatus.NOT_FOUND).json(classToPlain(error)); } } . . . . . . . . . |
If you are familiar with the Angular architecture, you are used to the decorators, that define classes as components, module or services. The same structure is used in NestJS. In the case above you its the decorator @Controller('trainings') handles this.
The controller now handles the different requests that are made with the specified route in the class-decorator. Above we see the findAll. The function is marked with the decorator @Get() and therefore handles all requests without parameters. As the name of the function implies, the response returns all trainings. They are retrieved from the database with the help of the trainings service, which is injected in the controllers constructor.
The first function handles requests without parameters. If you want to choose a specific training though, you have to filter according to a specified ID. Therefore we include another function, that handles requests, that contain the id of the requested training as parameters. In our example this is the function findOne(@Param() params, @Response() res). According to the first function the method is decorated. This time the decorator is including a parameter though. With @Get(':id'). To use the parameters in the function the params are passed into the function as @Param() params next to the response @Response() res. Inside the function the prameters can be handled and stored accordingly const id = parseInt(params.id, 10);.
Services
The data manipulation is handled through a service, that is invoked by the controller. In this example we have a deeper look into the Trainings-Service. In the example below we work with a simple mock repository TRAININGS. The mock data is loaded into the variable training in the constructor. From there, we use them in various methods that return and manipulate the data according to the controller’s method call.
|
1 2 3 4 5 6 7 8 9 10 11 12 13 14 15 16 17 18 19 20 21 22 23 24 25 26 27 28 29 30 31 32 33 34 35 36 37 38 39 40 41 42 43 44 45 46 |
@Injectable({ scope: Scope.DEFAULT }) export class TrainingsService { trainings: TrainingsEntity[] = []; constructor() { this.trainings = TRAININGS; } reset(): void { this.trainings = TRAININGS; } findAll(): TrainingsEntity[] { return this.trainings; } findOne(id: number): TrainingsEntity { return this.trainings.find(t => t.id === id); } update(id: number, values: TrainingsEntity): boolean { this.trainings = this.trainings.map(t => { return (t.id === id) ? {...t, ...values} : t; }); return true; } create(training: TrainingsEntity): TrainingsEntity { training.id = this.getNextId(); this.trainings.push(training); return training; } remove(id: number): boolean { this.trainings = this.trainings.filter(t => t.id !== id); return true; } private getNextId(): number { let newId = 0; this.trainings.forEach((currentTraining) => { if (currentTraining.id > newId) { newId = currentTraining.id; } }); return newId + 1; } } |
Serving static files
So now we can serve the frontend according to the specified request. There is a special module in NestJS which allows us to create static contents, e.g. SPA’s. The module can be easy installed with:
|
1 |
npm install --save @nestjs/serve-static |
After the installation we have to import the ServerStaticModule into our AppModule. Thats can be done by adding the content to the rootPath in the forRoot()-method as you can see below.
We want to use this module to serve our static logo-images. To implement this, lets have a look at our images-controller. The controller contains the same functions as above. We send a GET request to the database with an image-id. If the image exists, we can load the image from the image path, otherwise we throw an exception.
|
1 2 3 4 5 6 7 8 9 10 11 12 13 14 15 16 17 18 19 20 21 22 23 24 |
@Controller('assets/images/trainings') export class ImagesController { constructor() { } @Get(':image') @ApiResponse({ status: 200, description: 'Training with given id.'}) @ApiResponse({ status: 404, description: 'Training with given id does not exist.'}) findOne(@Param() params, @Response() res): string { const imageName = params.image; if (imageName==="") { return res.status(HttpStatus.BAD_REQUEST).json(); } try{ return res.status(HttpStatus.OK).sendFile(`/images/trainings/${imageName}`, { root: 'assets' }); } catch (e) { const error = new CustomError(HttpStatus.NOT_FOUND, 'Not found', `Image ${imageName} not found.`); return res.status(HttpStatus.NOT_FOUND).json(classToPlain(error)); } } } |
|
1 2 3 4 5 6 7 8 9 10 11 12 13 14 15 |
@Module({ imports: [SettingsModule, UserModule, TypeOrmModule.forRoot(TypeOrmConfig), AuthModule, TrainingsModule, ImagesModule, ServeStaticModule.forRoot( {rootPath: join(__dirname, '..', 'assets')}, )], controllers: [AppController], providers: [AppService], }) export class AppModule { } |
Conclusion
As you can see NestJS and its architecture is quite similar to the angular framework. Its an open source project licenced by MIT and a really good choice if you want to make a modern website with an easy backend. If you worked with angular in the past you will get in easily and fast, else, you also get in very easy. If your choice in web development is NestJS, you will see that the framework comes with many features and options out of the box.

Janik Kessler
Developer at 
Hi, I'm Janik. I'm a web development enthusiast and love to share my experiences. As a software trainer and engineer, I always seek to exchange ideas with other developers. I've been part of the theCodeCampus team since 2019 and have had the opportunity to meet many exciting engineers, learning a great deal from their experiences.
I'm also a trainer at theCodeCampus