
July 2, 2026
Server-Side Rendering in Angular – Boost Your User Experience
Klicke hier, für die deutsche Version des Artikels.
Server-Side Rendering (SSR) in Angular 21: Faster Load Times and a Better User Experience
With Angular v21, server-side rendering (SSR), hydration, and zoneless change detection have become an integral part of the standard stack, making them even more central to modern Angular applications. If you want to know what server-side rendering means in Angular, why it makes sense, and what possibilities the current Angular versions (from v19 to v21) offer you in terms of SSR, prerendering, and hybrid rendering, you’ve come to the right place.
This article is part of the Angular Guide, where we cover current features and important architectural topics.
If you want to learn more about the new Resource API and Angular in detail, visit one of our Angular courses:
- Angular Basic Training: https://www.thecodecampus.de/schulungen/angular
- Advanced Training: https://www.thecodecampus.de/schulungen/angular-advanced
What is SSR in Angular, and what are its benefits?
By default, Angular apps load in the browser. This means the client loads the application, runs the JavaScript, and only then builds the UI. This process can delay the initial rendering for large apps or on slow connections.
This is exactly where server-side rendering (SSR) comes in. The server renders the application, or parts of it, and sends finished HTML to the client. The browser thus receives content that users can see immediately, even before the JavaScript has fully loaded and executed. After that, Angular takes control as usual.
This provides us with the following benefits:
- Content appears faster: Even with large applications, users see something on the screen almost instantly after the initial load.
- Better user experience on slow connections: Especially on mobile devices, SSR can help reduce perceived load times, as users see content right away and don’t notice that Angular is still loading in the background.
- Stronger foundation for SEO & social media: Indexing, link previews, and performance rankings work significantly better because the server provides fully rendered HTML immediately upon the page’s initial load.
- Basis for modern hybrid strategies: You can specifically combine SSR with pure client-side rendering and prerendering (SSG); you control these modes individually depending on the route and use case.
What is the current status in Angular v21?
The release announcement for Angular v19 highlighted three key areas: route-level render modes, incremental hydration, and a zoneless rendering approach. Since then, the Angular team has further expanded these features in versions 20 and 21, making them a central component of the official hybrid rendering model.
An overview of the most important new features and enhancements:
- Route-Level Render Mode / Hybrid Rendering: Starting with Angular 19, you use the ServerRoute interface to specify how Angular handles each route: via the server (SSR), the build process (Prerender), or the client (CSR).
- Incremental Hydration: Introduced in Angular 19 as a Developer Preview, it allows for the incremental hydration of individual template sections based on triggers such as “on viewport” or “on interaction.” In subsequent versions, this became stable based on Deferrable Views (
@defer). - Zoneless Angular: With Angular 20 and 21, the development team has significantly advanced support for using Angular without zone.js. In Angular 21, Zoneless Change Detection is the default for new projects, which also creates a better performance foundation and clearer change detection semantics for SSR scenarios.
How do I use server-side rendering in my Angular application?
With the Angular CLI, you have two options for enabling SSR in your application. When you create a new Angular project using ng new, you’ll be asked right away if you want to use server-side rendering. Of course, there’s also a command you can use to add SSR to your existing application: ng add @angular/ssr
This will generate four new files:
server.ts: Angular provides you with a fully-fledged, lightweight Node.js web server based on Express. When a user visits your page, this server receives the request, launches Angular in the background, renders the page, and sends the finished HTML back to the browser.src/main.server.ts: Just as main.ts is the starting point for your app, this file is its exact counterpart for the server. It tells the Node server how to start your Angular app.src/app/app.config.server.ts: Here you can define configurations and providers that apply only to the server.src/app/app.routes.server.ts: This file handles server routing. Here you specify which pages of your application are rendered server-side or client-side.
Render Modes at the Route Level: Precise Control Over SSR, Prerendering, and Client-Side Rendering
By default, Angular renders all routes with parameters on the server and pre-renders static routes without parameters once you enable server-side rendering. Angular v21 makes this process significantly more flexible. Using route-level render modes, you can specify whether Angular renders a route on the server, in the client, or during the build process.
In our example, we have defined a different render mode for each of our three pages in app.routes.server.ts:
- The About page uses client-side rendering (CSR): Angular builds the page in the browser only after the browser finishes loading the JavaScript →
RenderMode.Client - Angular prerenders the Legal Notice page: The framework renders the page exactly once during the app build and converts it into a static HTML file. Developers often call this Static Site Generation (SSG)→
RenderMode.Prerender - The server renders all other pages (SSR), such as the Product Page: Every time a user calls the route, the server re-renders the component and sends the finished HTML to the browser →
RenderMode.Server
|
1 2 3 4 5 6 7 8 9 10 11 12 13 14 15 16 |
import { RenderMode, ServerRoute } from '@angular/ssr'; export const serverRoutes: ServerRoute[] = [ { path: 'about', renderMode: RenderMode.Client, }, { path: 'imprint', renderMode: RenderMode.Prerender, }, { path: '**', renderMode: RenderMode.Server, }, ]; |
We can also see the difference between CSR and SSR directly by comparing the page source code of the About page and the Product page. You can view the page source code of your Angular application in the browser by pressing Ctrl + U or by right-clicking to open the context menu.
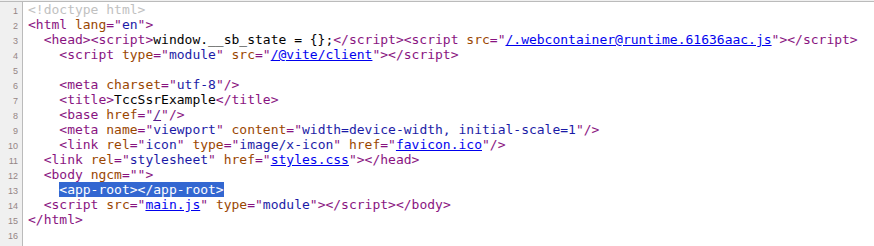
This is the source code for the About page. Here we can see that the body only contains <app-root></app-root> and there is no HTML in the source code. Everything we see on the About page is rendered in the browser only after the JavaScript has loaded.
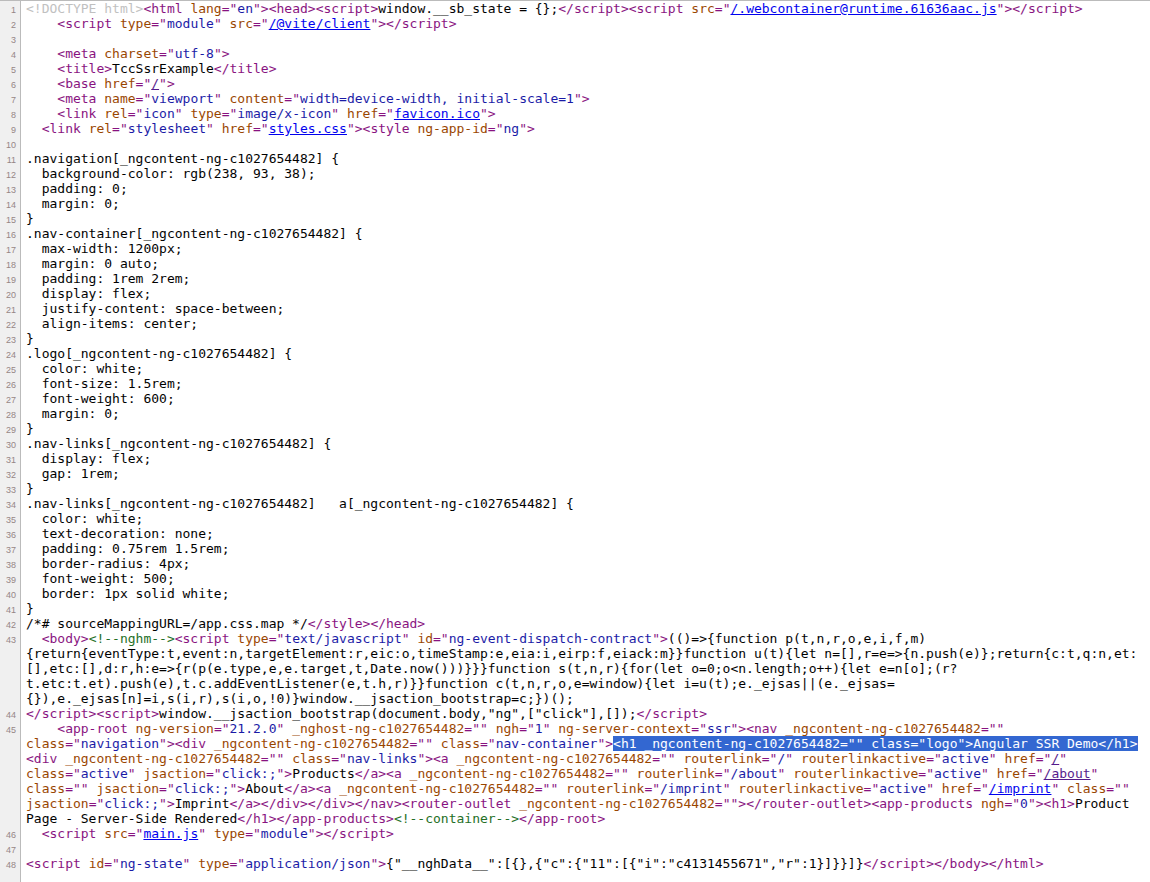
In contrast, we can clearly see HTML and CSS in the source code of the product page: <h1>Angular SSR Demo</h1>. In this case, the server handles the rendering, and the browser can display the content of the product page immediately without waiting for the JavaScript file to load.
What is hydration?
Hydration refers to the process by which Angular links its internal logic and event listeners to the server-generated HTML that is already visible. First, the DOM structure is merged with the Angular components, and then the event handlers are registered. However, this also means there is a brief window of time during which the user can already see the UI, but no logic is yet associated with it. Usually, this is only a matter of milliseconds, but with a poor internet connection, it can last for seconds.
Of course, Angular provides us with a tool for this: withEventReplay().
This is a function we can specify in app.config.ts when configuring hydration.
|
1 2 3 4 5 6 7 |
import { provideClientHydration, withEventReplay } from '@angular/platform-browser'; export const appConfig: ApplicationConfig = { providers: [ provideClientHydration(withEventReplay()), ], }; |
This way, Angular captures all user interactions and places them in a queue. Once the JavaScript has finished loading, all interactions are automatically executed one after the other. This ensures that no interactions are lost.
You can find more information about Hydration in the Angular documentation.
Incremental Hydration: Optimized loading times through controlled component hydration
Incremental Hydration, introduced as a Developer Preview in Angular 19, solves a key SSR problem: With standard full-app hydration, the entire server-rendered page is immediately made interactive with JavaScript. This also affects areas that the user doesn’t need right away. This leads to unnecessarily large initial bundles, longer load times, and blocks the browser—which negatively impacts Core Web Vitals such as INP (Interaction to Next Paint) and TBT (Total Blocking Time). Incremental Hydration hydrates only the necessary parts at the right time, while the rest remains static and is loaded later via Event Replay.
To use Incremental Hydration, we replace withEventReplay() with withIncrementalHydration() in app.config.ts. Since Incremental Hydration builds on Event Replay, all user interactions will continue to be captured.
|
1 2 3 4 5 6 7 |
import { provideClientHydration, withEventReplay } from '@angular/platform-browser'; export const appConfig: ApplicationConfig = { providers: [ provideClientHydration(<strong>withIncrementalHydration()</strong>), ], }; |
How do you use incremental hydration?
Now that we’ve told Angular that we want to use incremental hydration, we can use deferrable views on our product page to specify exactly when each part of our UI should be hydrated. You can find more information about deferrable views here.
|
1 2 3 4 5 6 7 8 |
@defer (hydrate on hover) { <div class="product-card deferred"> <div class="product-image">📱</div> <h4>Smartphone X</h4> <p class="price">899,99 €</p> <button>Buy</button> </div> } |
Within @defer blocks, you use hydrate to define when Angular should hydrate the content:
hydrate on: This allows you to access various predefined triggers. For example:viewport– triggers when the content becomes visible on the screeninteraction– triggers when the user interacts with the contenthover– triggers when the user hovers over the content
hydrate when: This allows you to define your own trigger specifying the condition under which the content should be hydratedhydrate never: This allows you to completely disable hydration. The content remains static during the initial load.
Important: Hydration only optimizes the initial load of the application; in other words, the hydrate triggers only take effect when the page is loaded for the first time.
However, you can also combine the hydrate triggers with the regular triggers of Deferrable Views:
|
1 2 3 |
@defer (on idle; hydrate on interaction) { // ... } |
In our example, Angular uses hydrate on interaction during the initial page load. On every subsequent page load or render by the client, on idle is used. For example, when the user clicks a router link that loads a page containing this component.
Experience is the best teacher: Hands-On for SSR
Are you ready to put theory into practice? All the examples we’ve shown and discussed in this article are available as interactive projects on Stackblitz.
What topics will we cover next?
Another hot topic in Angular right now is Signal Forms! We’ve already published an introductory article on the subject: Signal Forms – Quickly create Reactive Forms in Angular
This article provides an introduction and overview of Signal Forms, how to use them, and what makes them so groundbreaking.
Future articles will also focus on Signal Forms, where we’ll take a closer look at specific topics.
Related posts:
 Server-Side Rendering in Angular – Booste deine User Experience
 [Aktuell mit v21] Angular Guide – Überblick zu allen Signal Themen und Hot Topics
[Latest in v21] Angular Guide – Overview of all Signal topics and other highlights
[Aktuell mit v21] Angular Guide – Überblick zu allen Signal Themen und Hot Topics
[Latest in v21] Angular Guide – Overview of all Signal topics and other highlights
 Reactive APIs in Angular Teil 1 – Resource API resource() und rxResource()

Anne Naumann
Developer at 
Hi, I'm a web developer with a focus on frontend technologies, especially Angular. I also have a lot of fun when it comes to UI/UX and when I need to make room for new books on my bookshelves.
I'm also a trainer at theCodeCampus